
ٹام کروز اور اینا ڈی آرمس کی ایک دوسرے کو ڈیٹ کرنے کی خبر نے سوشل میڈیا پر سنسنی مچا دی ہے۔ یہ افواہیں سب سے پہلے فروری میں شروع ہوئیں، جب جوڑے کو لندن میں ایک ساتھ دیکھا گیا۔ اب انہیں ایک بار پھر ایک ساتھ دیکھا گیا ہے جس نے ان کے ساتھ ہونے کی افواہوں کو ہوا دی ہے ۔
Nuq4 الاحدث الأسئلة
-

Countries With Most Smartphone Users: دنیا میں سب سے زیادہ اسمارٹ فون استعمال کرنے والے 10 ممالک Most Smartphone Users: جانئے ان 10 ممالک کے بارے میں جہاں اسمارٹ فون استعمال کرنے والوں کی تعداد سب سے زیادہ ہے۔ اس عالمی فہرست میں ہندوستان کی درجہ بندی آپ کو حیران کر سکتی ہے۔ : اسمارٹ فونز ڈیجیٹل دوراقرأ المزيد
قراءة أقلCountries With Most Smartphone Users: دنیا میں سب سے زیادہ اسمارٹ فون استعمال کرنے والے 10 ممالک
Most Smartphone Users: جانئے ان 10 ممالک کے بارے میں جہاں اسمارٹ فون استعمال کرنے والوں کی تعداد سب سے زیادہ ہے۔ اس عالمی فہرست میں ہندوستان کی درجہ بندی آپ کو حیران کر سکتی ہے۔ : اسمارٹ فونز ڈیجیٹل دور کا ایک اہم حصہ بن چکے ہیں۔ آج شاید ہی کوئی ایسا ہو جس کے پاس اسمارٹ فون نہ ہو۔ اسمارٹ فونز نے عالمی مواصلات کو بالکل نئی سطح پر لے جایا ہے، جس سے ہر چیز آپ کی انگلی پر دستیاب ہے۔ کاروبار، سوشل نیٹ ورکنگ، تعلیم، اور ادویات سے لے کر ہر چیز اب صرف ایک اسمارٹ فون کے ساتھ قابل رسائی ہے۔ 2025 تک، دنیا میں 7.21 بلین سے زیادہ اسمارٹ فونز ہوں گے، جو کہ دنیا کی آبادی کا 90 فیصد سے زیادہ ہے۔ ٹیکنالوجی میں تیزی سے ترقی اور ڈیجیٹل دور کے ساتھ، یہ تعداد مستقبل میں کم ہونے والی نہیں ہے۔ اب، نیوزو اور سی آئی اے کی تازہ ترین رپورٹ کے مطابق سب سے زیادہ اسمارٹ فون استعمال کرنے والے ٹاپ 10 ممالک کی فہرست پر ایک نظر ڈالتے ہیں۔. 1. چین: چین میں اسمارٹ فون استعمال کرنے والوں کی سب سے زیادہ تعداد ہے، جن کی تعداد تقریباً 974.69 ملین ہے۔ WeChat Pay اور Alipay جیسی ادائیگیوں سے لے کر بہت سی ڈیجیٹل سروسز تک، چینی صارفین زیادہ تر اپنے فون پر ہوتے ہیں۔ اس کے علاوہ، 5G نیٹ ورکس کا وسیع پیمانے پر استعمال اور Huawei اور Xiaomi جیسی مقامی موبائل کمپنیوں کا تعاون بھی اس تعداد میں اضافہ کرتا ہے۔. 2. ہندوستان: ہندوستان میں 659 ملین سے زیادہ اسمارٹ فون صارفین ہیں، جو اسے دوسرا سب سے بڑا ملک بناتا ہے۔ انٹرنیٹ تک رسائی، سستا ڈیٹا اور ڈیجیٹل سرکاری پروگرام جیسے آدھار اور UPI بھی اسمارٹ فونز کے پھیلاؤ میں کلیدی کردار ادا کرتے ہیں۔ زیادہ تر ہندوستانیوں کے لیے، اسمارٹ فون انٹرنیٹ سے چلنے والا پہلا آلہ ہے جسے وہ کام، تعلیم اور تفریح کے لیے استعمال کرتے ہیں، خاص طور پر دیہی علاقوں میں جہاں روایتی کمپیوٹر ابھی تک نایاب ہیں۔3. USA: ریاستہائے متحدہ میں 276.14 ملین اسمارٹ فون صارفین ہیں، جو اسے تیسرا سب سے بڑا ملک بناتا ہے۔ ڈیجیٹل بینکنگ، گھر سے کام، تفریح اور آن لائن کامرس کلچر کی وجہ سے یہاں اسمارٹ فون کا استعمال بڑھ گیا ہے۔ سلیکون ویلی کی موجودگی کا مطلب ہے کہ امریکیوں کو نئی ٹیکنالوجیز اور رجحانات تک جلد رسائی حاصل ہو جائے۔ یہ بھی اہم ہے کہ بہت سے امریکیوں کے پاس ایک سے زیادہ اسمارٹ فون ہیں
Ali1234الباحث
-
Sonu Nigam Birthday: گلوکاری کی دنیا میں نام کمانے والے سونو نگم آج سنیما کی دنیا میں بہت مقبول گلوکار ہیں۔ ملک کے ساتھ ساتھ بیرون ملک بھی ان کی زبردست فین فولوئنگ ہے۔ اپنی آواز کا جادو بکھیرنے والے سونو نگم کو موسیقی کی دنیا میں اپنا نام بنانے کے لیے کافی جدوجہد کرنی پڑی۔ یہی نہیں، جس فلم کے لیے اناقرأ المزيد
Sonu Nigam Birthday: گلوکاری کی دنیا میں نام کمانے والے سونو نگم آج سنیما کی دنیا میں بہت مقبول گلوکار ہیں۔ ملک کے ساتھ ساتھ بیرون ملک بھی ان کی زبردست فین فولوئنگ ہے۔ اپنی آواز کا جادو بکھیرنے والے سونو نگم کو موسیقی کی دنیا میں اپنا نام بنانے کے لیے کافی جدوجہد کرنی پڑی۔ یہی نہیں، جس فلم کے لیے انہوں نے پہلی بار گایا تھا، وہ بند کر دی گئی تھی۔ نئی دہلی۔ بالی ووڈ کے پلے بیک سنگر سونو نگم آج اپنی سالگرہ منا رہے ہیں۔ وہ 30 جولائی 1973 کو فرید آباد میں پیدا ہوئے۔ آج وہ اپنی آواز سے دنیا پر راج کرتے ہیں۔ لیکن، اس مقام تک پہنچنے کے لیے انھیں کافی مشکلات کا سامنا کرنا پڑا
قراءة أقل
مداحوں کے دلوں کی دھڑکن بننے والے سونو نگم کو ہر نسل پسند کرتی ہے۔ سونو نگم کا موسیقی کا سفر اتنا ہی دلچسپ رہا ہے جتنا کہ مشکلات سے بھرا ہوا ہے۔ موسیقی صرف سروں کا میل نہیں ہوتا بلکہ یہ احساسات کی زبان ہے۔ جب اس احساس کو سونو نگم کی طرح آواز ملتی ہے تو بات ہی کچھ اور ہوتی ہے۔ یہ سیدھہ دل تک پہنچتا ہے۔ سونو نگم ایک ایسے ہی فنکار ہیں جن کی آواز کا جادو ہر عمر کے لوگوں میں کافی مقبول ہے سونو نگم نے اپنے کیریئر میں کافی جدوجہد کی ۔ انہیں فلم ‘بہ وفا صنم’ (1995) کے گانے ‘اچھا صلہ دیا’ سے کافی پہچان ملی۔ اس گانے نے انہیں راتوں رات اسٹار بنا دیا۔ یہ گانا ان کے کیرئیر میں سنگ میل ثابت ہوا۔
-
اگر آپ اکثر ٹرین کا سفر کرتے ہیں تو کبھی یہ خیال آیا کہ ٹریک پر ہر طرف اتنے زیادہ پتھر کیوں بکھرے ہوئے ہوتے ہیں؟ یہ چھوٹے پتھر ٹریک کے درمیان اور دونوں اطراف میں ہر جگہ موجود ہوتے ہیں تو ان کی موجودگی کی وجہ کیا ہے؟ یہ سوال بہت دلچسپ ہے اور اس کا جواب اس سے بھی زیادہ دلچسپ ہے۔ درحقیقت ریلوے ٹریک پاقرأ المزيد
اگر آپ اکثر ٹرین کا سفر کرتے ہیں تو کبھی یہ خیال آیا کہ ٹریک پر ہر طرف اتنے زیادہ پتھر کیوں بکھرے ہوئے ہوتے ہیں؟
یہ چھوٹے پتھر ٹریک کے درمیان اور دونوں اطراف میں ہر جگہ موجود ہوتے ہیں تو ان کی موجودگی کی وجہ کیا ہے؟
یہ سوال بہت دلچسپ ہے اور اس کا جواب اس سے بھی زیادہ دلچسپ ہے۔
درحقیقت ریلوے ٹریک پر ان پتھروں کی موجودگی کے پیچھے ایک سائنسی وجہ چھپی ہوئی ہے۔
بظاہر تو ٹرین کا ٹریک دیکھنے میں بہت سادہ نظر آتا ہے مگر حقیقت میں اتنا سادہ نہیں۔
اسٹیل ٹریک کے درمیان کنکریٹ یا لکڑی سے بنے تختے موجود ہوتے ہیں جن کو سلیپر کہا جاتا ہے۔
ان سلیپرز کے نیچے اور درمیان میں پتھر موجود ہوتے ہیں جن کو ballast کہا جاتا ہے، اس کے نیچے مٹی سے بنی مزید 2 تہیں ہوتی ہیں جس کے بعد زمین کی عام سطح آتی ہے۔
یعنی ہم کو تو لگتا ہے کہ ٹریک کو عام سطح پر بچھایا گیا ہے مگر یہ درست نہیں، اگر آپ باریک بینی سے جائزہ لیں تو یہ ٹریک عام سطح سے کچھ بلند ہوتے ہیں۔
پاکستان جیسے ممالک میں استعمال ہونے والی ٹرینوں کا وزن لاکھوں کلوگرام کا ہوتا ہے اور یہ بوجھ ٹریک اکیلا اٹھا نہیں سکتا۔
ٹریک پر ہر جگہ پھیلے پتھر اس کام میں مدد فراہم کرتے ہیں اور وہ خاص قسم کے ہوتے ہیں جو ٹرین کے گزرنے کے ارتعاش سے بھی اپنی جگہ سے نہیں ہلتے۔
اگر وہاں عام پتھروں کا استعمال ہو تو وہ ٹرین کے گزرنے کے نتیجے میں اپنی جگہ سے سرک جائیں گے جس سے ٹریک بھی اپنی جگہ سے ہٹ سکتا ہے۔
اگر آپ ٹریک پر ٹرین کو گزرتے ہوئے دیکھیں تو نظر آئے گا کہ وہاں پھیلے پتھر اپنی جگہ سے ہلتے نہیں جبکہ تختوں کو بھی اپنی جگہ مستحکم رکھتے ہیں، اس طرح ٹریک ٹرین کا بوجھ آسانی سے اٹھا لیتا ہے۔
ان پتھروں کے استعمال کی چند اور وجوہات بھی ہیں۔
جب ٹرین گزرتی ہے تو اس کی حرکت سے ارتعاش بھی پیدا ہوتا ہے جس سے ٹریک کے پھیلنے کا امکان ہوتا ہے، اس ارتعاش کے اثر کو یہ پتھر کم کردیتے ہیں۔
اسی طرح اگر یہ پتھر موجود نہ ہوں تو کنکریٹ کے سلیپرز مستحکم نہیں رہ پاتے اس کے نتیجے میں ٹریک کے لیے ٹرین کا وزن سنبھالنا بہت مشکل ہوسکتا ہے۔
اور ہاں اگر یہ پتھر موجود نہ ہو ں تو ٹریک پر گھاس، پودے اور درخت اگ سکتے ہیں جس سے ٹرین کو سفر کے دوران مشکل کا سامنا ہوسکتا ہے، مگر یہ پتھر کسی قسم کے سبزے کو اگنے نہیں دیتے۔
ان پتھروں کی وجہ سے بارش کا پانی بھی ٹریک پر کھڑا نہیں ہوتا بلکہ زمین کے اندر چلا جاتا ہے۔
اس طریقہ کار کا استعمال 200 سال سے زیادہ عرصے سے کیا جارہا ہے اور اب بھی بہت مؤثر ثابت ہورہا ہے۔
قراءة أقل
-
4 دہائیوں قبل سپر ماریو ویڈیو گیم دنیا بھر میں بہت زیادہ مقبول ہوئی تھی۔ اس نے دیگر گیمز کو پیچھے چھوڑ کر اپنے عہد میں سب سے مقبول گیم کا اعزاز اپنے نام کرلیا تھا۔ سپر ماریو بروز گیم کو ستمبر 1985 میں متعارف کرایا گیا تھا، شروع میں جاپان میں اسے پیش کیا گیا اور پھر بتدریج دنیا بھر میں لوگ اسے کھیلنےاقرأ المزيد
4 دہائیوں قبل سپر ماریو ویڈیو گیم دنیا بھر میں بہت زیادہ مقبول ہوئی تھی۔
اس نے دیگر گیمز کو پیچھے چھوڑ کر اپنے عہد میں سب سے مقبول گیم کا اعزاز اپنے نام کرلیا تھا۔
سپر ماریو بروز گیم کو ستمبر 1985 میں متعارف کرایا گیا تھا، شروع میں جاپان میں اسے پیش کیا گیا اور پھر بتدریج دنیا بھر میں لوگ اسے کھیلنے لگے۔
جس کمپنی نے اسے تیار کیا گیا اس کے مطابق گیم کی بدولت اس کے سسٹم کی 4 کروڑ سے زائد کاپیز فروخت ہوئیں اور اس طرح یہ ہر دور کی مقبول ترین گیمز میں سے ایک بن گئی۔
اس گیم میں ایک مونچھوں والے پلمبر ماریو کو دکھایا جاتا ہے جس نے سرخ ٹوپی پہنی ہوئی ہوتی ہے اور بیشتر افراد چہرہ دیکھ کر ہی اسے پہچان لیتے ہیں، چاہے انہوں نے ماریو گیم کھیلی ہو یا نہ ہو۔
ماریو کا کردار 200 سے زائد مختلف ویڈیوز گیمز کا حصہ بنا اور اسے سب سے زیادہ فروخت ہونے والی ویڈیو گیم فرنچائز قرار دیا جاتا ہے۔
مگر اس کا نام ماریو کیوں رکھا گیا؟
جب اس گیم کو تیار کیا گیا تھا تو ڈیزائنر نے اسے جمپ مین کا نام دیا تھا۔
مگر کمپنی کے واشنگٹن کے کرائے کے گودام کے ملازمین نے اس گیم کریکٹر کو ماریو کہنا شروع کر دیا کیونکہ انہیں لگتا تھا کہ یہ کردار دیکھنے میں گودام کے مالک سے بہت زیادہ ملتا جلتا ہے۔
گودام کے مالک کا نام ماریو سی گل تھا اور ملازمین کی جانب سے کردار کو ماریو کہنے پر کمپنی نے نام تبدیل کر
قراءة أقل
-
ایک اچھی پہیلی وہ ہوتی ہے جس کا جواب تلاش کرنا آسان نہیں ہوتا جبکہ ذہن کی اچھی ورزش ہو جاتی ہے۔ تو اگر آپ چائے یا کافی پینا پسند کرتے ہیں تو یہ پہیلی ضرور پسند آئے گی۔ اس پہیلی میں آپ کے سامنے نیچے 4 کپ موجود ہیں جن پر نمبر لکھے ہوئے ہیں، جیسے بائیں کونے میں موجود کپ کا نمبر 4 ہے، اس کے برابر وااقرأ المزيد
قراءة أقلایک اچھی پہیلی وہ ہوتی ہے جس کا جواب تلاش کرنا آسان نہیں ہوتا جبکہ ذہن کی اچھی ورزش ہو جاتی ہے۔
تو اگر آپ چائے یا کافی پینا پسند کرتے ہیں تو یہ پہیلی ضرور پسند آئے گی۔
اس پہیلی میں آپ کے سامنے نیچے 4 کپ موجود ہیں جن پر نمبر لکھے ہوئے ہیں، جیسے بائیں کونے میں موجود کپ کا نمبر 4 ہے، اس کے برابر والے کپ میں 9، پھر 5 اور آخر میں 7 نمبر والا کپ ہے۔
پہیلی کا سوال یہ ہے کہ جب اوپر سے کافی انڈیلی جائے گی تو پائپوں سے گزرنے کے بعد کونسا کپ سب سے پہلے اس مشروب سے بھرے گا؟
-
ہیں۔ فلکیات کے ماہرین کے مطابق ان ستاروں کے لیے صحت، دولت اور رکے ہوئے کام اس ماہ ہونے کے امکانات روشن ہیں، آئیں دیکھتے ہیں کہ وہ تین ستارے کون سے ہیں۔ برج حمل: سب سے پہلے بات کریں گے برج حمل کی، اس برج کے حوالے سے ماہرین کا کہنا ہے کہ ان کے مالی حالات مضبوط ہوں گے اور زندگی میں خوشیاں دستک دیں گیاقرأ المزيد
ہیں۔
فلکیات کے ماہرین کے مطابق ان ستاروں کے لیے صحت، دولت اور رکے ہوئے کام اس ماہ ہونے کے امکانات روشن ہیں، آئیں دیکھتے ہیں کہ وہ تین ستارے کون سے ہیں۔
برج حمل:
سب سے پہلے بات کریں گے برج حمل کی، اس برج کے حوالے سے ماہرین کا کہنا ہے کہ ان کے مالی حالات مضبوط ہوں گے اور زندگی میں خوشیاں دستک دیں گی۔ مختلف ذرائع سے رقم کی آمد ہوگی۔
وہ افراد جو صحت کے حوالے سے پریشان ہیں، ان کے لیے مثبت نشانیاں ہیں۔
برج اسد:
ان افراد کو پیسوں کی طرف سے اس ماہ مشکلات کا سامنا نہیں ہوگا، کاروباری افراد کو اس مہینے منافع ہوسکتا ہے، اور نئے معاہدے جو کرنا چاہتے ہیں وہ کرسکتے ہیں، اس میں کامیابی کے زیادہ آثار ہیں۔
اس کے علاوہ ان افراد کو بچوں کی طرف سے اچھی خبر ملنے کے امکانات ہیں۔
طلباء کو مطلوبہ نتائج حاصل ہوں گے،کسی بھی بڑی صحت کی پریشانی کا سامنا کرنے کے امکانات کم ہیں لیکن اس ٹائم لائن کے دوران لوگوں کو صحت کی معمولی پریشانیوں کا سامنا کرنا پڑ سکتا ہے
قراءة أقل
Ali1234الباحث
-
دی۔ ایکسپریس نیوز کے مطابق وزیر اعظم کی زیر صدارت اجلاس میں وفاقی کابینہ کی جانب سے حج 2026 کیلیے نئی پالیسی کی منظوری دی گئی۔ کابینہ نے سرکاری کوٹے پر حج 2026 کی بکنگ کا آغاز اگست 2025 سے ہوگا، حاجیوں سے قسط وار پیسے لئے جائیں گے جبکہ پرائیویٹ ٹورآپریٹرزکو صرف 60 ہزارحاجی لے کرجانے کی اجازت ہوگی۔اقرأ المزيد
دی۔
ایکسپریس نیوز کے مطابق وزیر اعظم کی زیر صدارت اجلاس میں وفاقی کابینہ کی جانب سے حج 2026 کیلیے نئی پالیسی کی منظوری دی گئی۔
کابینہ نے سرکاری کوٹے پر حج 2026 کی بکنگ کا آغاز اگست 2025 سے ہوگا، حاجیوں سے قسط وار پیسے لئے جائیں گے جبکہ پرائیویٹ ٹورآپریٹرزکو صرف 60 ہزارحاجی لے کرجانے کی اجازت ہوگی۔
وزیراعظم نے پاکستان کیلئے حج کوٹہ بڑھانے کی منظوری بھی دیدی، پچھلے سال رہ جانیوالی پرائیویٹ حاجیوں کو لے کرجانا پرائیویٹ ٹورآپریٹرزکی ذمہ داری ہوگی۔
گزشتہ سال پاکستانیوں کیلئے حج کوٹہ 1لاکھ 79 ہزارتھا جس میں سے 50 فیصد کوٹہ سرکاری جبکہ 50 فیصد پرائیویٹ ٹورآپریٹرزکو دیا گیا تھا۔
حکومت پاکستان نے سعودی حکومت سے حاجیوں کا کوٹہ بڑھانے کی درخواست کررکھی ہے، امید ہے پاکستان کو اس سال 2 لاکھ 35 ہزارحاجیوں کا کوٹہ ملے گا۔
پالیسی کے مطابق حج کوٹہ 1 لاکھ 79 ہزار رہے یا 2 لاکھ 35 تک بڑھ جائے دونوں صورتوں میں نجی ٹورآپریٹرز کو 60 ہزارعازمین لے جانے کی ہی اجازت ہوگی۔
سرکاری حج کے اخراجات ساڑھے گیارہ سے ساڑھے بارہ لاکھ تک ہوں گے۔
کابینہ کو بریفنگ میں بتایا گیا کہ آئندہ برس پاکستان کا مجموعی ملکی حج کوٹا 70 فیصد حکومتی اور 30 فیصد نجی کوٹے کے تناسب سے تقسیم کیا جائے گا جبکہ گزشتہ برس نجی شعبے کی غفلت کی وجہ سے حج سے محروم رہ جانے والے افراد کا حج نجی کمپنیاں2026 میں یقینی بنائیں گی۔
بریفنگ میں بتایا گیا کہ نئی پالیسی کے تحت سرکاری اسکیم و نجی کمپنیوں کے تحت حج آپریشن کی تھرڈ پارٹی ویلیڈیشن یقینی بنائی جائے گی، پالیسی میں حج کے دوران حاجیوں کی سہولیات کے ساتھ ساتھ انہیں انکی رقوم کے متوازی سروسز فراہم کرنا شامل ہے۔
پالیسی میں آئندہ برس ایک ہزار نشستیں ہارڈ شپ کیسز کے تحت مختص کی گئی ہیں جبکہ کسی بھی نجی کمپنی کے لیے حاجیوں کی کم از کم تعداد 2 ہزار رکھی گئی ہے۔
بریفنگ میں بتایا گیا کہ پالیسیوں کے مطابق نجی کمپنیوں کی حج آپریشن کے دوران کڑی نگرانی کی جائے گی، پالیسی کے اطلاق کے بعد نجی کمپنیوں کے تحت درخواست گزاروں کی رقوم و پراسیس کی ریئیل ٹائم مانیٹرنگ یقینی بنائی جائے گی۔
بریفنگ میں بتایا گیا کہ حج 2026 کیلئے گزشتہ برس کی طرح معاونین کا انتخاب شفاف انداز سے ٹیسٹ کے ذریعے ہوگا جبکہ حجاج کیلئے موبائل سمز، ڈیجیٹل رسٹ بینڈز، بہترین رہائش و طعام اور کسی بھی ہنگامی و حادثاتی صورتحال کے نتیجے میں معاوضے کو یقینی بنایا جائے گا۔
کابینہ کو بریفنگ میں بتایا گیا کہ رقم کی ادائیگیوں، تربیت، شکایات و دیگر سروسز کیلئے پاک حج موبائل ایپلی کیشن کو مزید بہتر اور مؤثر بنایا جا رہا ہے۔
وفاقی کابینہ نے حج پالیسی 2026 کی متفقہ طور پر منظوری دی اور متعلقہ وزارتوں سمیت اداروں و پالیسی کی تشکیل میں کردار ادا کرنے والے افسران و اہلکاروں کی کوششوں کو سراہا۔
وزیرِ اعظم نے وزیرِ انفارمیشن ٹیکنالوجی کو وزارت مذہبی امور کے ساتھ مل کر حج آپریشن کی مکمل ڈیجیٹائیزیشن کو یقینی بنانے کی بھی ہدایت کی۔
وزیراعظم نے اجلاس میں گفتگو کرتے ہوئے کہا کہ حجاج کرام کو بہترین سہولیات کی فراہمی کیلئے آئندہ برس حج آپریشن کی مکمل ڈیجیٹائیزیشن خوش آئند ہے، حجاج کرام کو ہر قسم کی سہولیات کی فراہمی یقینی بنائی جائے گی
قراءة أقل
-
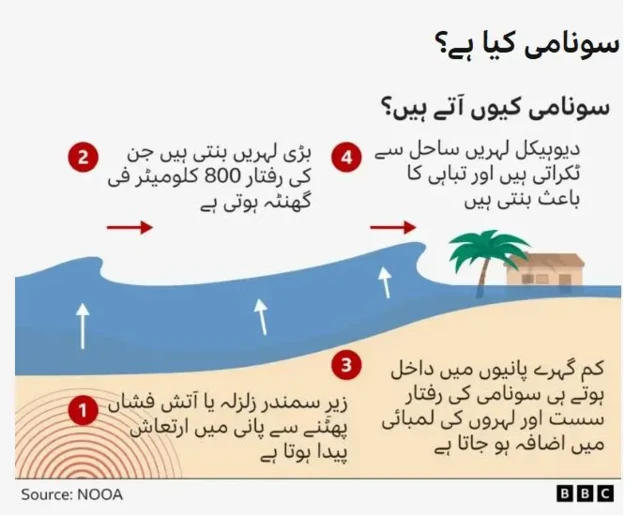
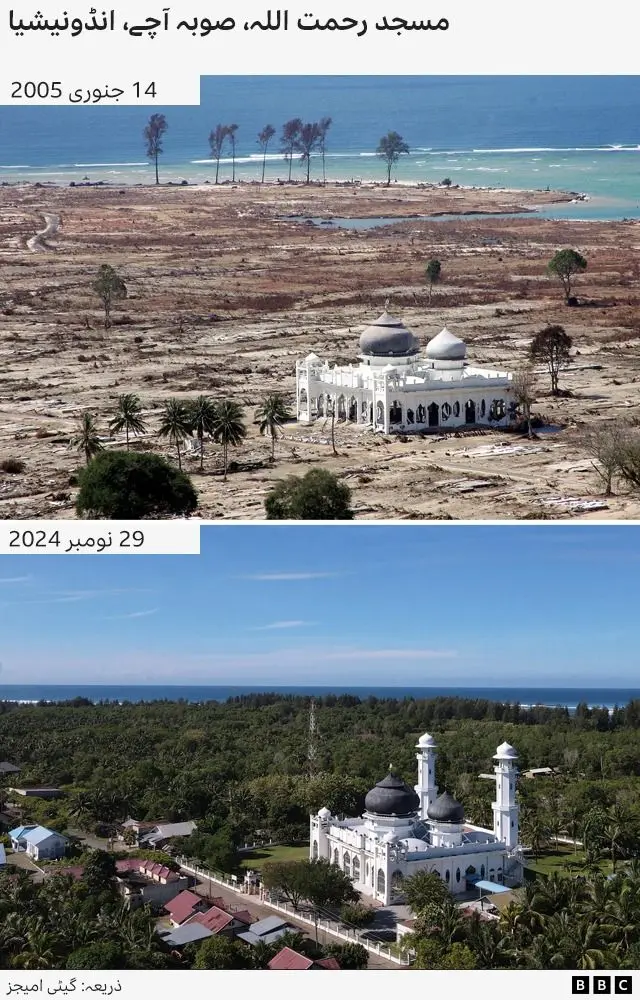
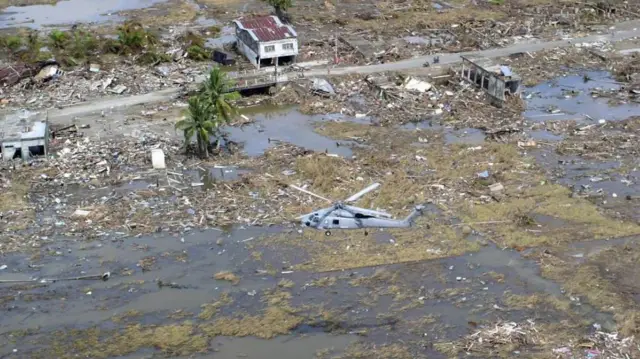
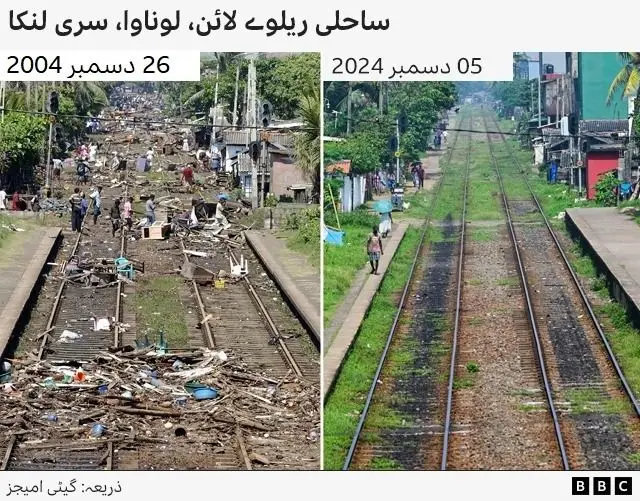
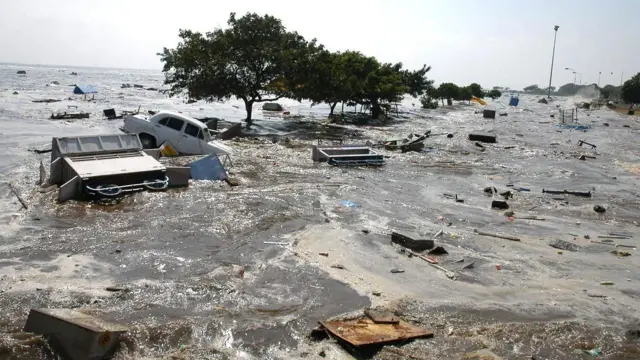
سونامی‘ ایک جاپانی لفظ ہے جو دو لفظوں کا مجموعہ ہے۔ ’سو‘ کے معنی ساحل یا بندرگاہ کے ہیں.
Ben Stokes ruled out of 5th Test: بین اسٹوکس کندھے کی انجری کے باعث بھارت کے خلاف آخری ٹیسٹ میچ سے باہر ہو گئے ہیں۔ انگلینڈ نے جمعرات سے کیننگٹن اوول میں کھیلے جانے والے پانچویں اور آخری ٹیسٹ میچ کے لیے اپنی پلیئنگ الیون میں چار تبدیلیاں کی ہیں۔ کپتان بین اسٹوکس دائیں کندھے کی انجری کے باعث دستیاب ناقرأ المزيد
Ben Stokes ruled out of 5th Test: بین اسٹوکس کندھے کی انجری کے باعث بھارت کے خلاف آخری ٹیسٹ میچ سے باہر ہو گئے ہیں۔ انگلینڈ نے جمعرات سے کیننگٹن اوول میں کھیلے جانے والے پانچویں اور آخری ٹیسٹ میچ کے لیے اپنی پلیئنگ الیون میں چار تبدیلیاں کی ہیں۔ کپتان بین اسٹوکس دائیں کندھے کی انجری کے باعث دستیاب نہیں ہیں۔ تیز گیند باز برائیڈن کارس کے ساتھ اسپنر لیام ڈاسن اور فاسٹ بولر جوفرا آرچر بھی آخری ٹیسٹ میچ سے باہر ہو گئے ہیں
قراءة أقل